Through this module, I have learnt so much more and understood more than the last, and this is because of the theme of communicating information. Graphic Design is complex and is not about just being aesthetically pleasing, which I have had to tear myself away from a couple of times in this module, liking the look of a mockup due to it's more daring style typeface but going with the more refined legible typeface which for its audience works to their advantage and is successful in attending to their needs of wayfinding or retaining important information.
Through the Wayfinding Brief, it is the subtle detail of the framing which laid the foundations for it's concept without having to use colour. Colour to me is something I often consider first as it is a quick way to remake something, associations already being tied to individual colours which are communicated in an instant to the viewer, but for the Art Gallery this would be just too much and there was no use for it. The Wayfinding needed to be quickly communicated and seen in the building easily and from far away, in which the framing set in the signage and contrast of black and white couldn't be faulted in.
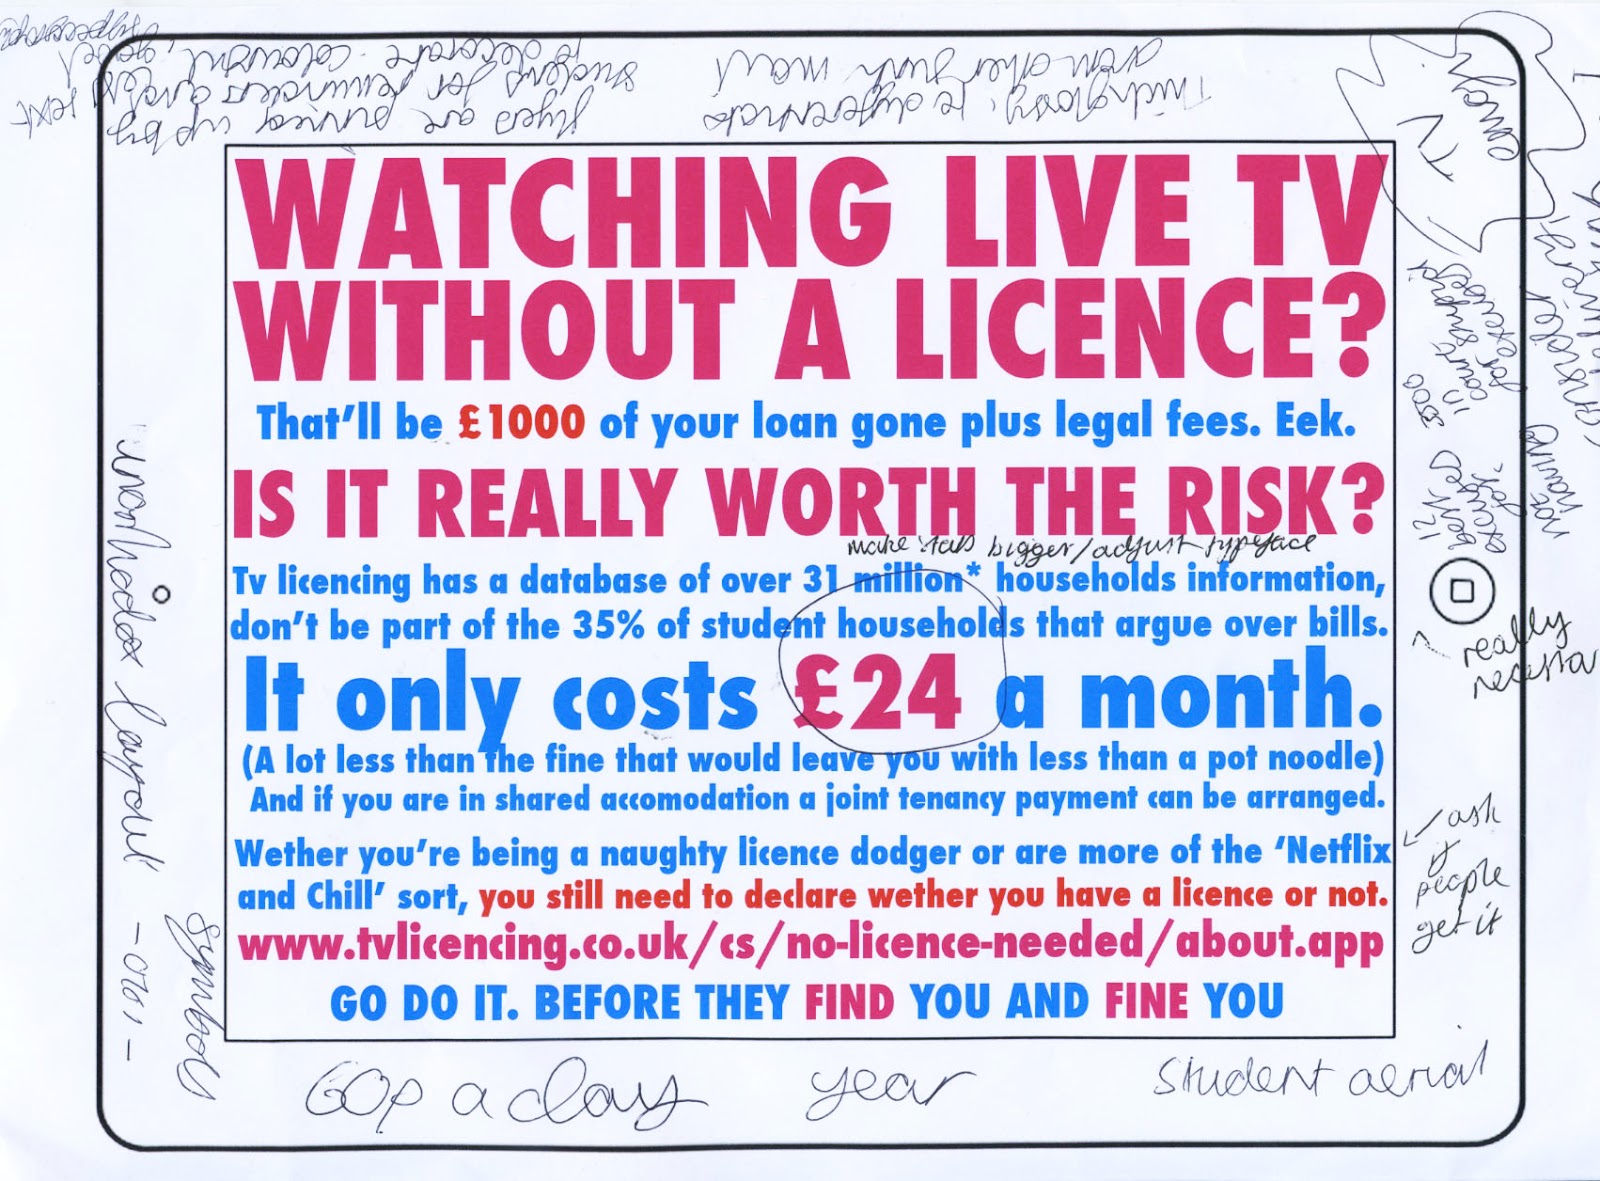
I enjoyed the proccess of making my Tv Licence booklet so much as I felt comfortable working for my own target audience and I enjoy condensing boring information in to more interesting engaging language, and working in a bold eye catching style. In future I should sketch what is related to different target audiences I could approach when coming up with ideas. First and foremost my knowledge of tools need to expand over time for better physical outcomes but I can say I thoroughly enjoyed this brief which is an exciting prospect for me and what is to come in following modules.
Again, I feel like I need a much wider variety of initial ideas to bring to feedback as they are a goldmine for seeing different interpretations of an idea and ways to expand and approach the practical side of the concept. It can be hard to tear away from one way of handling a brief when it is praised by peers and does work, but through these briefs I am learning the smaller ideas can lead on to way bigger concepts and functions. Despite minor mistakes, I know what they are and I learn from them each time, but most importantly I feel my final designs fit their purpose very well and I am satisfied with what I have accomplished and have enjoyed the module very much.
Saturday, January 23, 2016
Studio Brief 2 Tv Licence Evaluation
First off, as I have just finished making my final information leaflet, although I am not disappointed in my work and find my design decisions appropriate which have lead to quite a charming final outcome, a lot more thought in to the practical processes of print set-up and cutting should have been more thorough for a more perfect resolution and in future needs to be practised. My cards are not perfectly aligned/cut, the corners aren't perfectly rounded off and the gold pin isn't what would be used if sent out but I feel my outcome does demonstrate very well my design decisions and the function of my information leaflet.
The design itself I feel reaches to it's target audience and has the right tone of voice needed to put across the message in comparison to the very old Columbo advert, which could come across as ridiculous or scary and extremely outdated. Students/our age range need to not be patronised and reached to in a low pressure, trustworthy tone of voice as University can be daunting as it is, which I personally experienced, and getting a very formal daunting letter from the Tv Licening company wasn't a pleasant feeling, which is why I felt I needed to aim for this target audience and for my information leaflet to be approached different to serve a useful purpose. Using the TV Emoji and humour such as the cheeky Netflix and Chill phrase speaks to the age group in their language and can be more accepted opposed to warnings. The tone of voice used gains trust from its readers and would keep them swiping through to the end.
While putting together my final prints I was worried it could be tedious to move each card but as the CMYK colours are eye popping and the tone of voice engaging, and as its function is so different to a standard leaflet or letters we see everyday and you could say desensitized to, are more likely to finally probe them to declare their licence and not bin at a first glance. The tall brash prominent initial 'Stop' and the threat of a fine being the first page would prompt the reader to want to get to the next page to avoid this, and the order of the information of most alarming from the front and helpful to the back was done deliberately to keep them interested as it is at their best interest.
Within my research in to styles generally aimed at young adults, Din was a reoccurring choice with a young style to it. As it initially was used at first in Germany in the early 1900s being legible enough for the letters to be close together and fill signs to give power to the text on warning signs and street signs, and has a strong geometry and thickness to it. Not commonly used to small print, but to make powerful headers, it has worked really well as my cards are information>infographics heavy so I need to make the important information stand out as much as I could which I achieved using Din.
If I were to do this differently I would explore a different approach not tied to social media/TV's such as something related to University or other habits to have a wider range of ideas. I would also in future really try to gain knowledge of the tools used in the practical side of what I am producing to expand my skills and have the most successful distribution of my designs. Despite these small issues, the concept itself is a strong fusion of what is related to student life which I feel is strongly visually communicated through my final product and is something very different to what I have seen distributed which I am proud of. It grabs attention through it's text, tone of voice, design and visuals. I acknowledge in future I need to refine my practical skills and approach concepts from as many different angles as I can when decided on the target audience.


As for the pages, what I would have done differently would be the have the back page as the blank emoji the text is placed on or have the final page double sided with the one above it. The adjustments to the emoji itself removing its borders within the screen allowed the text to fill the screen without being made smaller to fit within these boundaries which were un needed.
Monday, January 18, 2016
Studio Brief 2 Final Adjustments and Print Process


After much asking around wether my first colour scheme is the strongest, or is the green/blue/pink more eye-catching and get the information across more impact fully, even though opinions were spread between both, most likely due to personal taste in colour, the first is what I will go on to print.
As well as the important infographics jumping off the page in the alarming yellow colour at different sizes, the trio of CMYK's primary colours bouncing off eachother makes the balance of information a success. The print will also be very strong which is one of the most important elements of this whole brief. e92888/00b2b2/f0d500

The glossiest stock was aesthetically pleasing and had a gorgeous feel to it but wasn't necessary for my information and its purpose. It could be said the shine relates to the reflection off a TV screen, but the other two had a shine without being overly glossy such as this stock and I felt it was too dramatic and distracted from the highlighted yellow information on my pages.

This type of stock had small imprints within it giving the stock more of a texture, but the print wasn't as defined as on the other two.

I felt this stock that I chose to go with had the sheen and reflectiveness of a TV screen as a subtle detail, but didn't distract from the information provided and the colours printed the most crisp and contrasted of all 3.

Due to time management being off to fault of my own, despite hearing there was a tool to use for cutting and rounding off edges, at first I tried with a craft knife which was very hard to navigate for me and left the paper with a frayed torn edge which isn't professional.

Before deciding to cut the edges with thin scissors for more control over the cut, ordering my cards the issue arose of what to bind them together with. Running out of time to go out and find bookbinding screws I decided using a gold pin would mimmick the screw as it allows the cards to rotate like intended and the rounded head would become part of the dial detail on the TV emoji (ideally the same dark grey rather than shiny gold.) The rounded off edges of the emoji also work in favour of my production design as it gives ease to the function of swiping/twisting the pages out rather than being all sharp edges which could be more irritating to move numerous times.
When coming to printing, on Indesign I put two to a page on A4 sheets of stock. I experimented with 3 types of postcard stock between 250-270 gsm which I preferred as it would have less wear and tear with the decision to have the layers being swiped to the side, and would be a more solid package altogether. I printed on stocks similar to the event flyers students receive day in day out.
What makes my design different is the stacks and bind which is unique in comparison to the flyers and letters that come through the post. In addition, being more like a pack this would stand out amongst what else we receive and at a glance may bin as it is familiar and considered junk/irritating, but the decision to have the pack serves the purpose of making students pay attention to the issue and get their licence declared to avoid fines. Due to it's humorous tone of voice and popping colours and familiarity to fun event leaflets and the modern language of emoji's, the use of an envelope which I had previously considered wouldn't be necessary.
Colour Fiction Adjustments and print plan
-Stock that will take well to colour, preferably crisp white.
-Stock that can be coloured on in felt tips as well as pencil crayons, stock which wont be ridged in to, to allow ease of colouring.
-Passport book size, enough space for colouring and to be a handout
-Places it would be distributed are schools, book fairs, party bags, art shops. Young audience, primary school ages. Can stretch among most years as it is not a serious formal booklet, but for own personal preference and development/interpretation of colour theory and a way to build on this knowledge.
-concertina style as I have never used folding techniques before and it allows the ease of colouring in the drawings without having to bend previous page.
-zigzag of concertina makes it desirable to have for fun as a child and relates to the carefree, relaxing, yet education of self awareness
-Most of space on page to be used but well balanced between figure and ground/whitespace. Also as the concertina is relatively small as a handout.


Adjusted vectors, after it was suggested my own worked better to be filled in and worked in harmony with the others rather than using all overly detailed internet images.
As for the typeface, Whitewood Hollow which is uncensored and unevenly kerned when applied in titles and do not all work in the same size to fill the page. Although this visually is my favourite personally, its practicality isn't strong enough.
Dill contends as the clearest and most childlike of the 3 due to large spacing with still being thickly outlined. I will try variations of the kerning as due to its space, letters being tighter won't be as much of an issue in terms of legibility.
Output
are the most popular choices due to the thick contrasts, and are versatile to the bright colours of the front and plain pages within, and can also be coloured in.
Dill was chosen as it is the most well functioning typeface in terms of sizing on pages due to various lengths of words and is the least handwrendered which means spacing is more even. I really liked the first typeface and thought it's unconventional kerning qualities and thick slashed outlines worked with the publications creative freedom and how it isn't meant to have the right colour answer, and the typeface not being perfect resonated with this. However, when put in to perspective next to the vectors Dill is the most appropriate typeface to go with.
Dill was chosen as it is the most well functioning typeface in terms of sizing on pages due to various lengths of words and is the least handwrendered which means spacing is more even. I really liked the first typeface and thought it's unconventional kerning qualities and thick slashed outlines worked with the publications creative freedom and how it isn't meant to have the right colour answer, and the typeface not being perfect resonated with this. However, when put in to perspective next to the vectors Dill is the most appropriate typeface to go with.
Wednesday, January 13, 2016
Pictures for Colour Fiction initial drawings and vectors


rough sketches of what illustrations would define each genre and have enough different compartments to colour in for enough colour options to project and that children would find engaging and identifiable.


2 different ideas, without own dinosaur vector yet as i can't decide. the previous idea doesn't seem exciting enough for kids to want to colour in.

Own vector or an internet image in corner as I cannot decide

Vector from own design which perhaps doesn't look professional enough, and the other bigger vector which is my own done over an internet image


Represents horror without being too scary. Not sure if actual internet bat is too much in comparison to balance of other images, outlined ones at bottom may be enough in small quantity and varied sizes

Simplified vector of internet image- but may look very separate to other images as it is in a different style. Clue layout looks well balanced and can all be different colours if the children decide
When presented to fellow students, the feedback was that I had balanced and filled the space very well for it's orientation and that the illustrations would be clear for the target audience. Improvements are to add black to parts such as eye sockets with no detail in to make illustrations less flat looking and for illustrations surrounding, go for simple outlines rather than small internet copies with over detail in balance with the figure of the page. The dinosaur will be taken forward as the action figure as it implies the genre lightly and is more exciting and makes more sense than my other two ideas.
It appears doing vectors for the first time was indeed a risk and I was scary to put forward my designs, but in turn has been a success and has made me more confident in using Illustrator software.
Tuesday, January 12, 2016
Final Designs Front Cover

Reminds me of Art Attack, very art styled typeface. However, also has a Flintstone aspect to its style.

Despite initially wanting to avoid thinner spaces within letters, the thick outline makes it look really legible and makes the background not overly distracting and works harmoniously with the shades.

More controlled lines but more of a sci-fi aimed look to its design and the figure and ground are balanced out which I don't want to happen, as I want the title to pop off the page.

Thicker lines give title more of a pop and more definition. If more tightly kerned it would look stronger.

The slant adds a fun power to the publication and adds enticement to open. Due to its design, kerning would have to be carefully thought out, or its more scrambled appearance could resonate with the freedom and choice of the child colouring in the book.

Very smooth lines make easy reading and tighter kerning can make it stronger.

A different approach to my idea for the typeface, due to the hump quirk. This makes it look slightly more mature but the design works on making the title stand out. Need to gather feedback.
To tie in with the theme of colouring in between the lines (or out if they decide to), but to match the pictures designed in slightly thick black line vectors I sought out typefaces that weren't too boring that they would put off a child being excited about opening the concertina, but to see the title pop out at them and contrast against the blend of all colours in the background. Either Colour Fiction or Cast Your Colour, as the first directly connects with the idea colours aren't definite non fiction, they are down to the child's imagination or interpretation based on the genre, and Cast Your Colour to hint their power over deciding the colours within the book which makes it personal to them giving the publication a unique quality.
Choosing the blended out colour wheel I feel is the appropriate cover as it is a handout publication meant to be educational but in a personalised, fun engaging way which makes the young audience want to have their input of their expression of colour theory through famous distinct fiction genres. The colours cover all aspects of the stretch of their imagination should be going, all the options to associate and input in to the drawings and be eye-catching to pick up. Also, the background fits as an introduction of what to come as by having the colour wheel dissected on the next page it works succesfully as a design decision. Having it a slightly paler saturation allows the figure/title to bounce off the page and still stands out peripherally without being too overwhelming. The subtle circling detail also gives the design a light design adding a depth/texture look to the cover.
Not going for extremely wobbly lines that indicate more of an illustrative task than a colouring in one, these typefaces pop out due to their thick strong outlines and fun non serious shapes. Not being too thin is also important as the space between the lines makes the title more legible and clear, and represents the spaces they have to fill within the concertina.
Monday, January 11, 2016
Studio Brief 2 Final Crit
-Make stats more impactful by using cost of licence a day which is around 40p, opposed to saying £24 a month which seems like more or the full annual amount.
-Introduce the sectioning and emphasise the stats whilst keeping the humour
-On on humour to not retract the student to seeing it as being all round serious as the letters
-Experiment with colours and type I have referred to in my handouts
-Stock needs to be crisp white to ensure best colour print, and thick to avoid wrinkling as it is interactive.
Rev's Vodka poster colour scheme, yellow being the most vivid in tone in comparison to using alarm red which stands out but tone is too similar to other colours. For the first attempt at the layout/colour scheme after feedback and my new multiple pages idea the important information in the yellow jumps off the page and would be eye catching even peripherally.

CMYK contrasting colours from Rev's vodka poster colour scheme


Tv Licenses own student aimed colour scheme applied

Milder combinations don't have the same dramatic effect, and working in black and white would make the impact of info graphics flat

doesn't balance with the height of texts

Different typefaces similar to event flyers that without colour, help the title bounce off the page
Despite the Mexcellent stripy font working well at grabbing students attention and popping off the page brilliantly, my first set at the top using all Din still alert the important information in yellow and is more coherent with the message I am trying to deliver and would be taken more seriously for the informative purpose, rather than just a good looking post through the door.
Friday, January 8, 2016
Studio Brief 2 Interim Crit and Research ADD FLYERS
Research and layout ideas/information preparation notes for the crit

I also showed peers info-graphic examples aimed at students, as well as flyers that seemed most popular to pin up in our flats. Colours, layout, typography styles and tone of voice are what I wanted them to capture to know what I was going for

Mix of bright to catch the readers attention, with use of the Din typeface which fills and contrasts really well amongst the different bright tones and looks more fun and dynamic than using a serif font such as times new roman for example.


Popular in student flats are huge, off the page popping bold titles with high contrast either black and white or across loud colours
These examples show how straight to the point these companies aim to be to engage busy stressed students, and Din proves to be a strong young dynamic typeface that works to make infographics look more than average.

Swivel style booklet of information with rounded off cut such as this example with TV emoji filling
Swivel part put in on the right dial of the emoji cards stacked together, to not invade the legibility of design and words and imitates the swiping right we do on our smartphones daily and means with more pages the information can be split in to sections and fill the screen meaning the text isn't as overwhelming as inital postcard design with all info on the back.
Capitals to command attention be bold as possible in comparison to TV licence letters sent through which are often ignored due to plain letter format. Bright colours, maybe even if I make an envelope if I feel it would still be ignored, will make the information stand out amongst other letters. Such as event flyers are often picked up and looked at by students and pinned on the wall for reference and due to their bold, loud designs without blocks of text. Appropriate for the target audience of students and is known from personal experience knowing we keep many in our flat for decoration and at friends flats.

Most popular I've seen are the boldly coloured ones, such as Revolutions vodka poster using bright yellow pink and blue CMYK Primary colours, such as the TV licencing ad aimed at students.This may be because students love vodka and posters, but using similar designs will make the readers pay attention whereas before this information does not get a second look. The swivel design also makes it different from any information leaflets I have seen and is a more interesting way to separate information and links in with the TV emoji layout working with our social media obsession, which our eyes are glued to a lot of the time therefore will attract people to this design.
Tyography, I will want to keep to 2 typefaces and I have experimented with sans serif bold for main headings and then considered less serious ones for more descriptive text below and to contrast the serious tone with the humorous tone of voice I am aiming for the target audience of students who turn a blind eye to the daunting serious tones of voice as it is new to our age group to have warnings and fines threatened as it is a new responsibility. This is meant to be a humorous suggestive information package that tells the target audience to stop ignoring it (which the design is done for, for initial attention drawn) and declare the licence instead of getting more of the serious letters coming through.
Pushing the fine amount of over £1000 is my main push in this information as with students being notoriously budgeting and often only just making it through the term with their student loan, if they are fined they will be in serious trouble and it would be a life ruining situation for many. I want to emphasize the risk in hand and if it is worth it, and suggest the other solutions such as catch up TV. Adding the Netflix and Chill joke went down well with peers as it is a funny saying all older age groups are catching on to and isn't overly offensive, but will engage the readers and make them maybe respect the information more if it is using their light hearted lingo and adds to the chance of them listening to the information if they feel it has their own interests at heart, and to visit the website which I will link.
If an envelope seems necessary to ensure the information is not just thrown away, despite knowing it will be quite costly to do, the envelope will have the same 3 colour scheme and be addressed specifically to the student such as the formal letters, but perhaps with something funny on it to ease them in to trusting it isn't a scary letter. 'Not Another TV Licence Letter' is an idea, as a play on the film 'Not Another Teen Movie' which drew people in as it was a piss take of standard american movies and the play on words would be understood by the target audience. Also, this information is delivered differently than the standard tv licence letter that is chucked away so often and not taken seriously, so having that or something similar on the envelope distinguishes the difference in tone of voice and really, it isn't a letter inside. This will be debated and put forward in the final crit tomorrow to see if this would be a successful idea that ties in with my main idea so far.


Experimentation with bold typography I could use and the layout frame, to try out before applying Din as I wanted to explore more options.

A very basic first try at how I can balance the important info with the smaller print in a less formal bold font that will work with putting students at ease and humorous tone of voice. It was identified and agreed this was too much information for one side and the important information such as the costs and warnings could be sectioned and made even larger if on different cards.

Subscribe to:
Comments (Atom)